
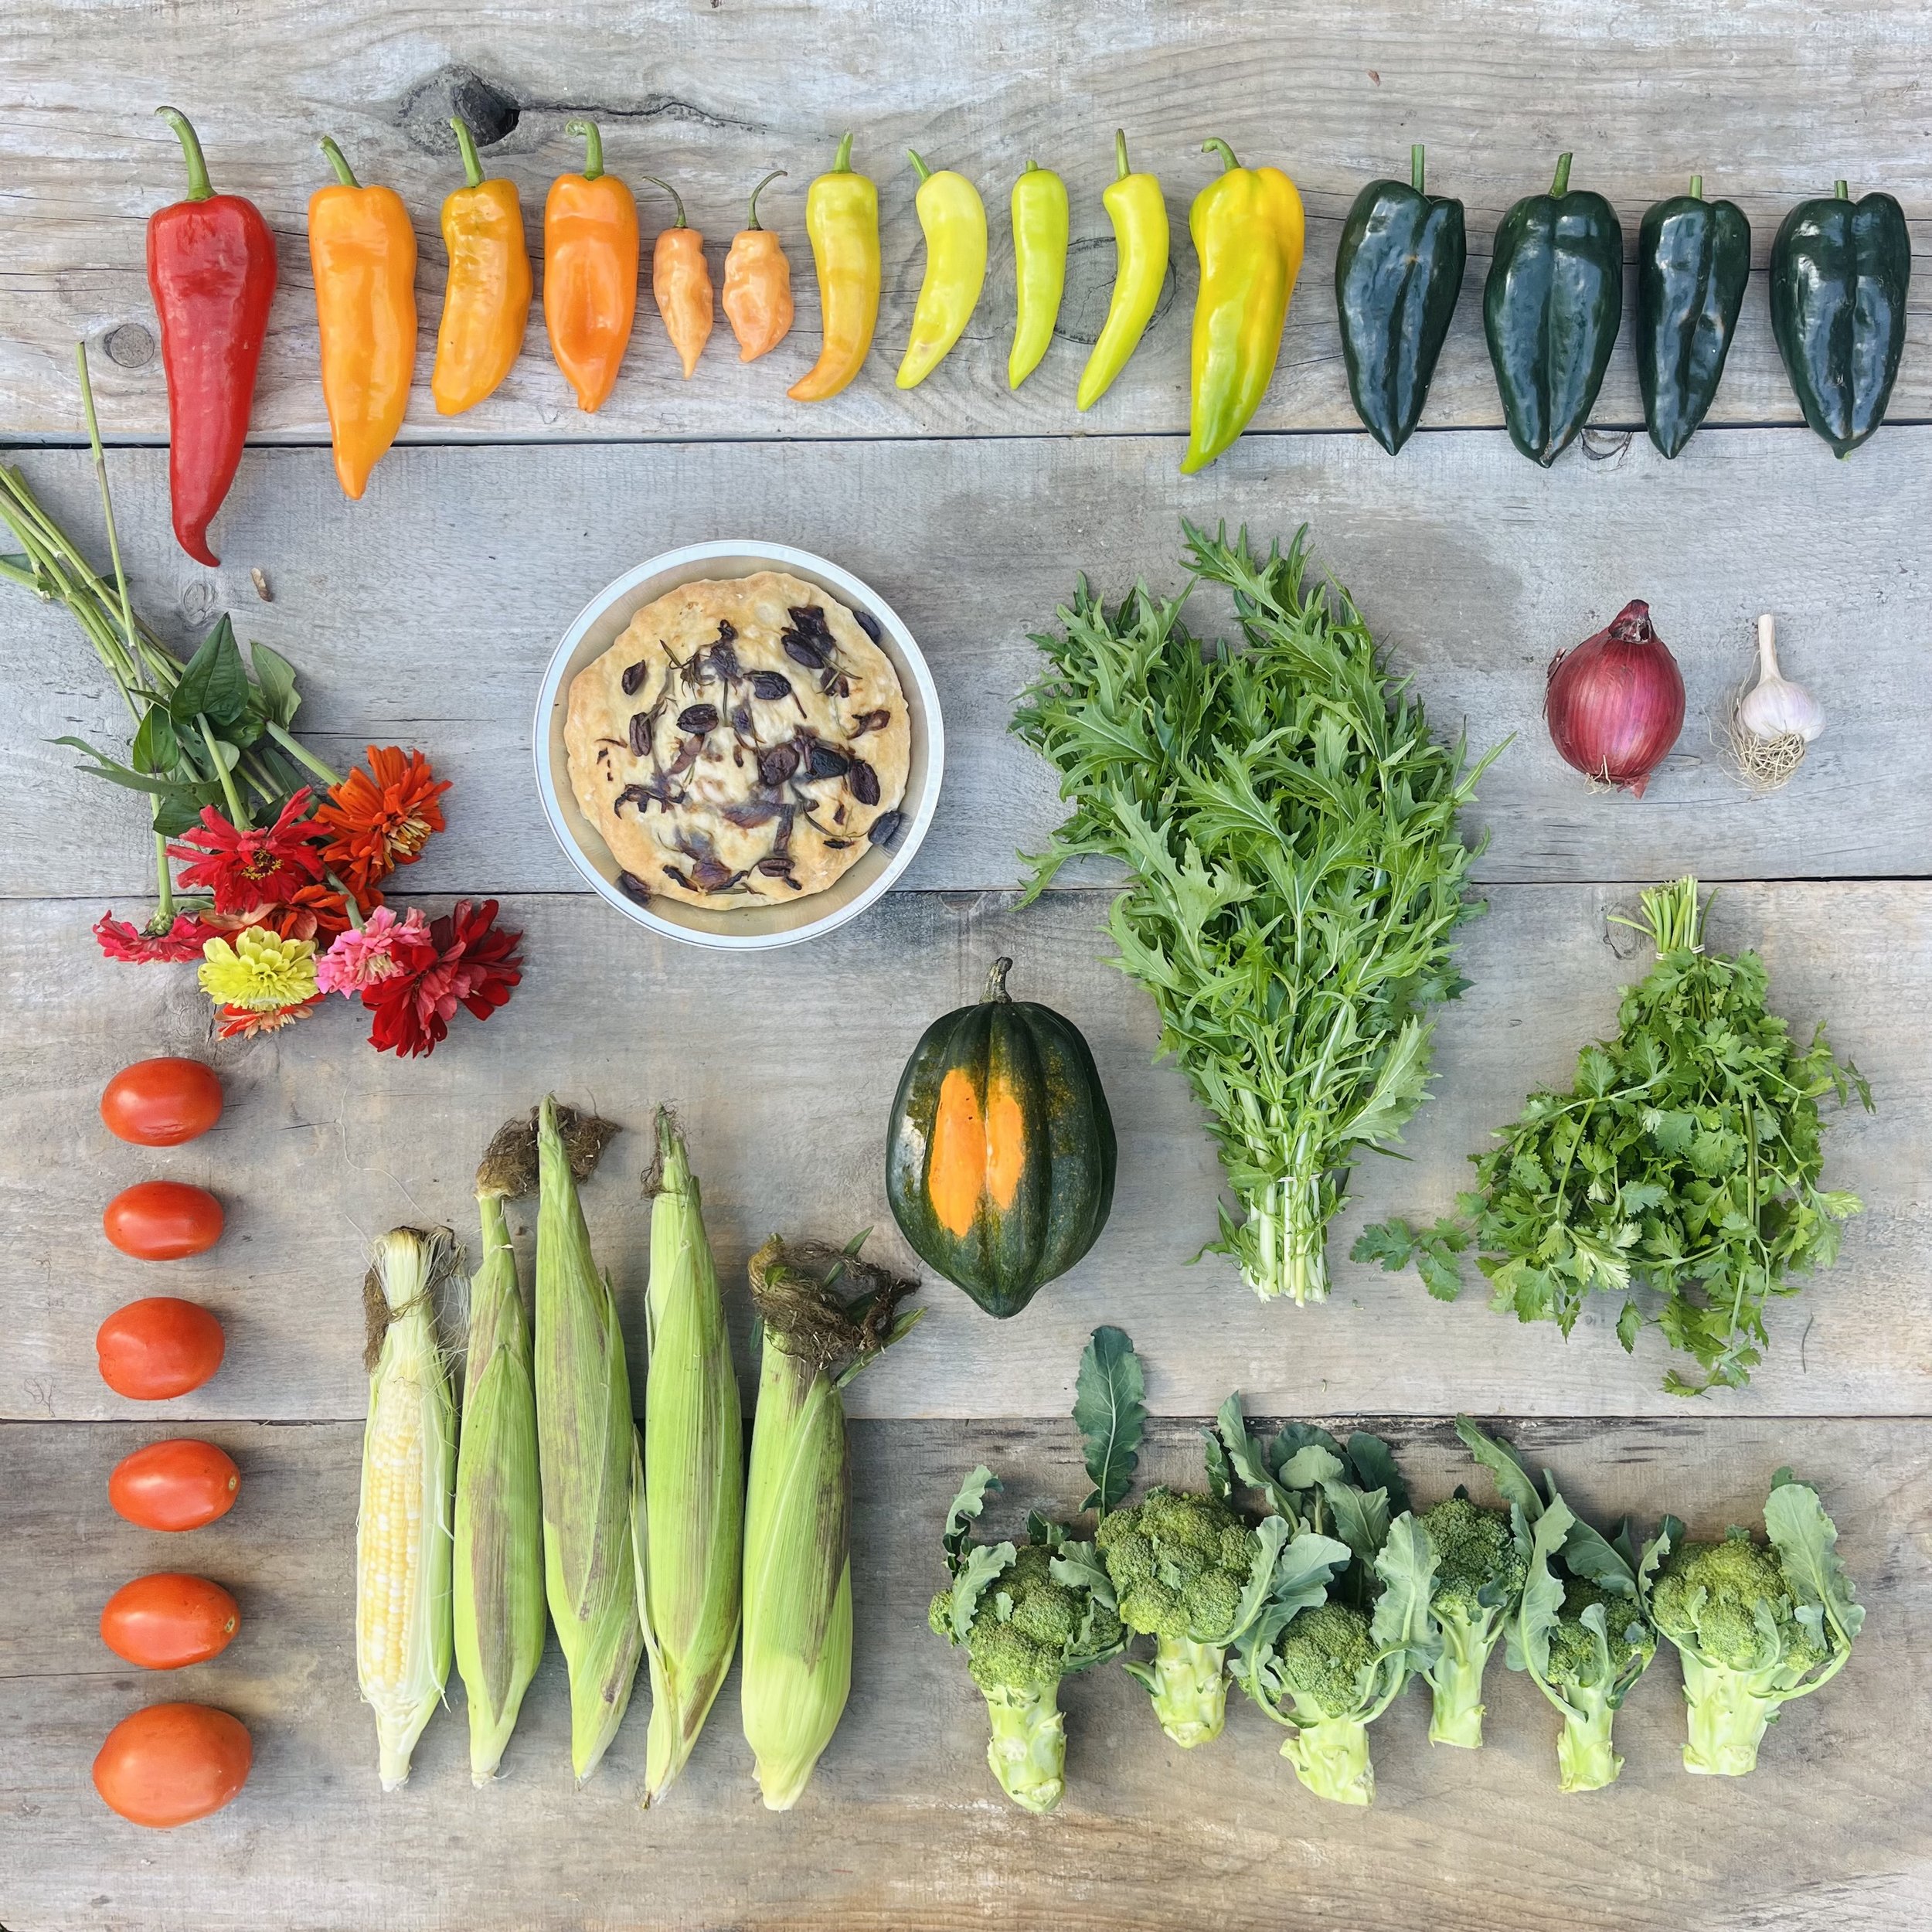
P I C K L I S T
october 18
carmen peppers - habanada pepper - hungarian hot wax - poblano peppers - zinnias - mizuna - red onion - garlic - cilantro - acorn squash - plum tomatoes - broccoli
BREAD OF THE WEEK: olive focaccia
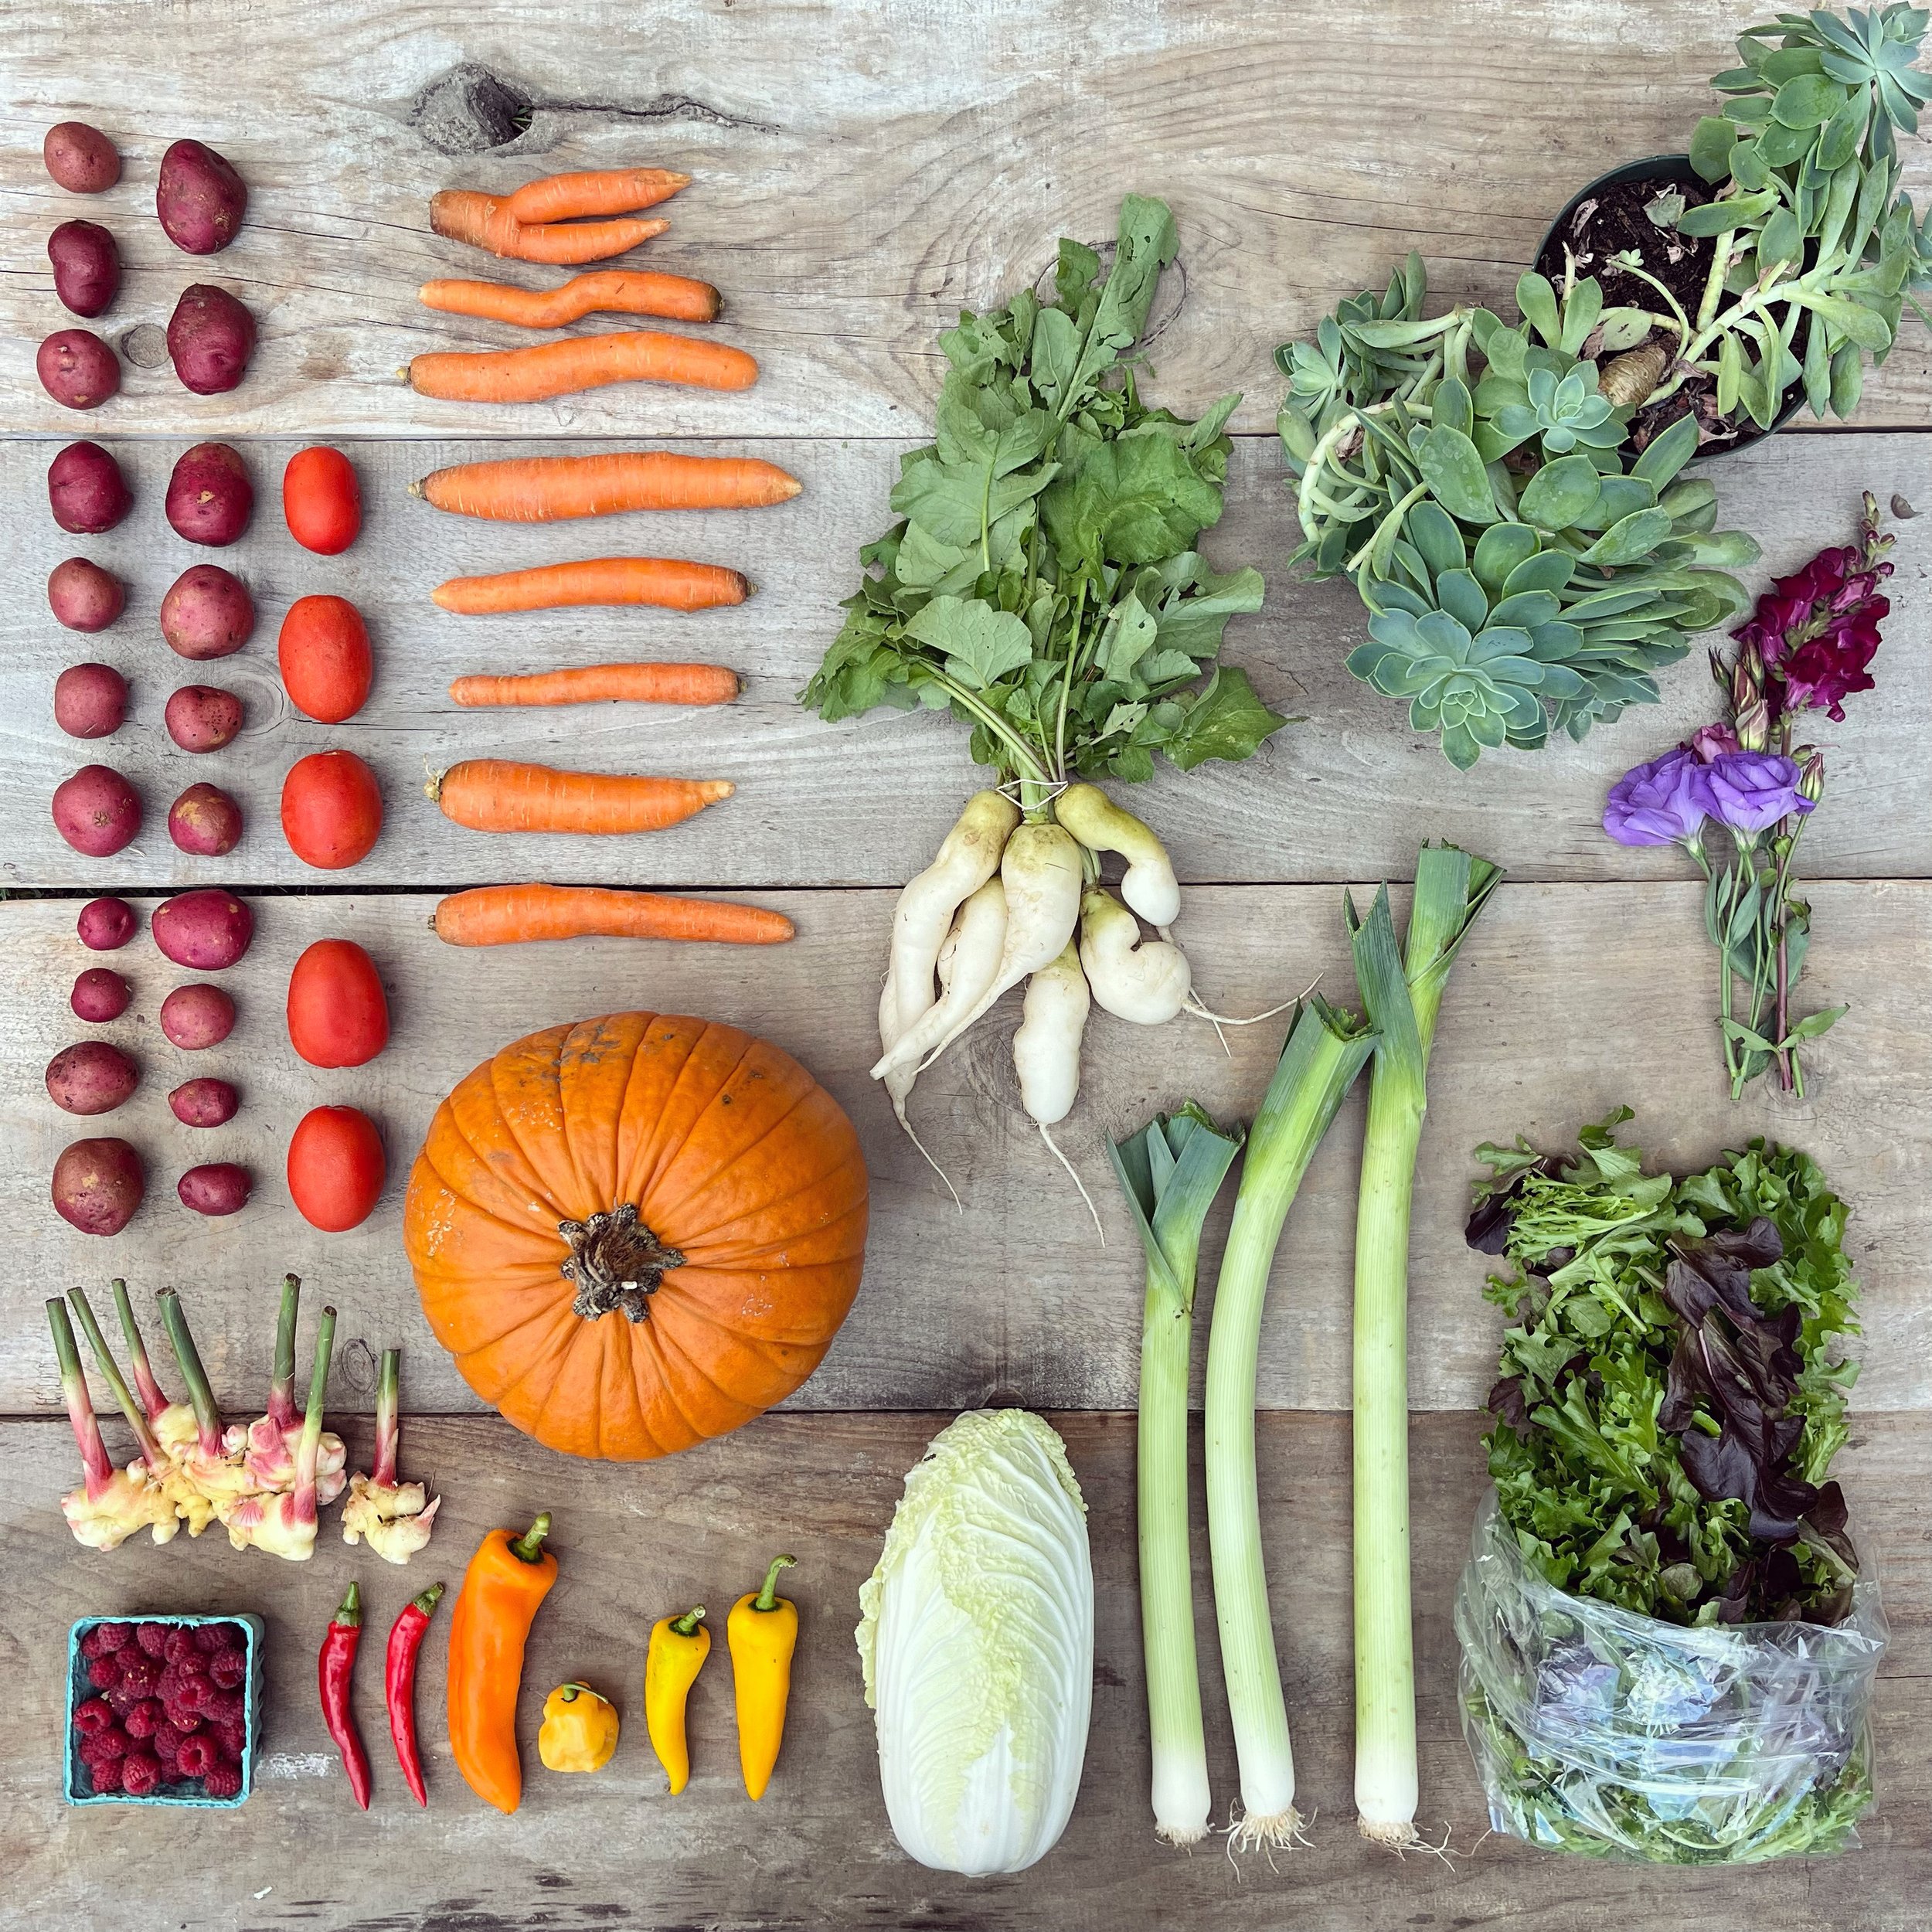
P I C K L I S T
october 25
NAPA CABBAGE - CARROTS - GINGER - DAIKON RADISH - LETTUCE - SNACKING SWEETIE PEPS - CARMEN PEPPER - CAYENNE PEPPER - HABANERO PEPPER - LEEKS - PLUM TOMATOES - GARLIC - RASPBERRIES - HOUSE PLANT - CARVING PUMPKIN - FLOWERS
BREAD OF THE WEEK: AUBERGINE BREAD
FARMY FOODIE PRO-TIPS:
Literally meaning “sour stuff,” this is the everyday Vietnamese pickle that you’ve seen and eaten countless times in bánh mì, on rice plates, and in other dishes. Ðồ chua is typically made with daikon and carrot, but you can use jicama instead of the daikon for a crunchy-sweet result. It does require more time: You can’t massage it as it will just break apart and you need to chill the pickle 1–2 days to allow the flavors to fully develop before using. If using daikon, choose one that is dense with firm, smooth skin, which are signs that it enjoyed good growing conditions and will likely taste more sweet than bitter. Precut jicama may be sliced into matchsticks for this pickle.
Makes about 6 cups
2 lb. daikon (about 1), peeled, cut into 3x¼" matchsticks
12 oz. carrots (about 6 medium), trimmed, peeled, cut into 3x¼" matchsticks
4 tsp. Diamond Crystal or 2½ tsp. Morton kosher salt
4 tsp. plus 1 cup granulated sugar
2½ cups distilled white vinegar
Preparation
Step 1
Toss 2 lb. daikon (about 1), peeled, cut into 3x¼" matchsticks, 12 oz. carrots (about 6 medium), trimmed, peeled, cut into 3x¼" matchsticks, 4 tsp. Diamond Crystal or 2½ tsp. Morton kosher salt, and 4 tsp. sugar in a medium bowl to combine. Let sit 20 minutes. You should be able to bend a piece of daikon to make the ends touch without it breaking. (If you need to speed up the process, you can massage and knead vegetables with your hands until softened, about 3 minutes.)
Step 2
Rinse vegetables in a large mesh sieve or colander under running water, then press or shake to expel excess moisture. Divide between two 1-qt. glass jars or airtight containers.
Step 3
Stir 2½ cups distilled white vinegar, remaining 1 cup sugar, and 2 cups lukewarm water in a medium bowl until sugar is dissolved. Pour into jars to cover vegetables; reserve any excess for making salad dressing (you may have about 1 cup liquid left over). Cover and let sit at least 1 hour at room temperature. Drain before using.
Do ahead: Vegetables can be pickled 1 month ahead. Chill.
BAECHU KIMCHI BY MORIHOUSE (@mori.house)/ Makes about one 750ml mason jar
1 large Napa Cabbage**, about 1kg/2lbs
Sea Salt (non-iodized), fine to semi-fine- 3% the weight of the Napa Cabbage
3-5 GARLIC cloves, thinly sliced
zest of 1 Lemon, sliced into thin slivers
2 dried Togarashi Chili Peppers or Chile de Arbol, chopped (deseeded, optional)
3-5 cloves Garlic, crushed into a paste
3-5 Tbsp Gochugaru (Korean Chili Pepper Flakes)***
1 Tbsp Fish Sauce (optional)
Pickling Brine* or Filtered Water
JENNY’S NOTE:
OTHER CSA CROPS TO ADD TO THIS KIMCHI RECIPE JULIENNED CARROTS/ SLICED DAIKON RADISHES/ MINCED OR GRATED GINGER
Supplies:
1x Mortar & Pestle
1x Large Mixing Bowl
2-3 Spoons for mixing
1x 750ml sterilized, air-tight Mason Jar
1x Knife or Cleaver
1x Heavy object like a large stone or a large mason jar filled with water for weighing down your pickles.
1x Dish Towel
1x Small jar or pitcher for collecting excess brine
1x Fork or utensil to press down the pickles into the jar
Prepare the garlic scapes, lemon zest and chili peppers as described. Cut your cabbage into 1/8ths lengthwise and then widthwise into approximately 3 inch chunks. (JENNY’S NOTE: Add your julienned carrots, sliced radishes, grated ginger here to the mix)
Place into a large bowl and scatter the salt, lemon zest, garlic and chili peppers over the cabbage. Gently massage the salt into the cabbage mixture evenly. As you are doing this, you will feel the cabbage excrete its water content. This will take just a few minutes.
Next use a plate or another round flat object which has a smaller circumference than the bowl, so it fits just inside rim and on top of the cabbage mixture. Using a large stone, mason jars filled with water or another heavy object, weigh the plate and cabbage down. Cover the top of the bowl with a towel to keep dust from getting in and let it sit weighed down like this for at least 3 hours to lightly pickle. After the 3 hours or more have elapsed, you will find the water from the cabbage will have filled the bowl to cover the kimchi in what is now a salty *pickling brine.
Decant the brine into a pitcher or jar and gently squeeze a little out of the cabbage mixture. At this stage you will have a fresh, lightly-pickled style of napa cabbage known in Japan as “Hakusai no Tsukemono”. If you don’t like spicy, you can skip ahead to the jarring stage.
Crush your garlic into a paste with a mortar and pestle and a couple pinches of salt to break it down easier. Add your gochugaru, fish sauce (if using) and using small amounts of the brine, make a paste similar in thickness to a tomato paste. Chuck this paste into the drained cabbage mixture, still in the original bowl, and massage all together, making sure the paste is distributed evenly.
Use the following final steps for both the spicy and non-spicy versions: Layer your kimchi into the mason jar in 3-4 stages. Between each layer, use a fork to gently press the kimchi down as flat as you can. Continue to do this until all the kimchi is in the jar. Give it a few more presses with a fork, getting as much oxygen and as many air bubbles out as possible. If your kimchi paste was the right consistency, brine will rise to the top as you press the air out of the kimchi. If not, add small amounts of brine until it does. If making only non-spicy Kimchi, you will definitely need to add some brine. This extra thin layer of liquid at the top will help to seal your kimchi during the beginning of the fermentation process. Seal the jar and place it in the coolest and darkest part of your home.
Next is the waiting! 1 MONTH is the sweet spot but while it may not be for everyone, do try to wait at least 5-7 days before tasting. It takes at least this long for there to be any noticeable fermentation. In the colder seasons, it may take even longer, up to 10 days. If you want to “taste-as-you-go”, be sure to use a clean utensil and DON’T double dip! However long your preferred fermentation time, you will need to help the kimchi release carbon dioxide gas every couple of days. You may notice that when you open it, the kimchi will bubble. Sometimes it will bubble like soda but it may also only bubble slightly or barely at all. Either way, you can rest assured that it is fermenting. Each time you release the gas, you will also notice the kimchi may have risen slightly. Using a fork press it down again as much as you can. Brine may or may not rise to cover the kimchi at this stage and that is ok.
Note: Depending on whether or not you sterilized your jar properly and the environment temperature, you may occasionally find trace amounts of white, blue or green mold on the top of your kimchi. DO NOT worry about this. Simply remove it from the kimchi or wipe it off if it is on the jar or lid. However, if you find black mold, I’m sorry to say your kimchi may have been contaminated by unwanted outside bacteria. At that stage, it is better to start over just to be safe. All this said, mold is highly unlikely using this method.
After 1 month (or shorter) has elapsed, enjoy your kimchi as a side to most of your favorite Asian dishes, cook it in a dish or eat it as a snack!
**Do not use standard or savoy cabbage to substitute. However, you can use Bok Choy (same weight) as a substitute if Napa Cabbage is nowhere to be found.
***Note: I have had some students use Cayenne Pepper, Paprika or Chili Powder in lieu of Gochugaru before, but please use caution as the spice levels between these differ substantially. If you are absolutely unable to get Gochugaru and still want to try making spicy kimchi, start by making your paste with just one tablespoon of one of these substitutes. Taste it first, then add more, tablespoon by tablespoon until you reach a spice-level which is tolerable for you. However, I suggest you do try to add Gochugaru as a regular item in your kitchen. It is very versatile and easy to find online or at Asian Markets.